
View Encapsulation: what, how, and why
"View encapsulation" is the term for the handy angular feature that allows you to write CSS selectors within a component and be assured that those selectors will automatically be scoped to that component only. That means that you can write CSS like this:
ul li{
	background-color:teal;
}
without having to worry about the background color of the rest of your apps list items turning teal.
You can change the default encapsulation by importing ViewEncapsulation from @angular/core and setting the encapsulation property in your component decorator like so: encapsulation: ViewEncapsulation.VALUE.
How does this work?
The default encapsulation mode is Emulated. If you don't specify an encapsulation mode, then it'll default to this mode. It works by generating a custom HTML attribute which gets added to both your template and your CSS selector. Here's a simple template:
  <div>
    <h2>Emulated</h2>
    <ul class="list-group">
      @for(item of listItems; track item){
        <li class="list-group-item">{{item}}</li>
      }
    </ul>
  </div>
and it's corresponding CSS:
      div{
        padding:1rem;
        border:1px dashed grey;
        margin:1rem;
      }
      ul{
        padding:unset;
      }
When we inspect the DOM, we can see the attribute that Angular created.
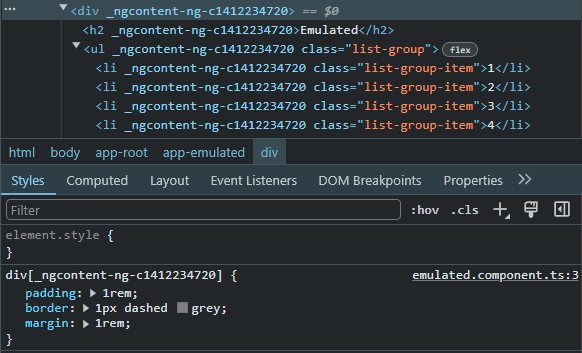
So Angular generated an HTML attribute _ngcontent-ng-c1412237720 and used it to narrow our CSS.
In addition to Emulated, we also have ShadowDom and None. None is easy enough. When enable it, then any of the CSS you write inside your component will also affect any other elements that match that selector. Essentially, it's like you're writing global styles.
Personally, I've never really seen a reason to do this. Angular has a global stylesheet, and it seems to me that any global styles you might write in a component should just go there instead. If anyone can think of a compelling reason to use it, I'd love to hear it.
That just leaves us with ShadowDom. In case you're not familiar with the shadow DOM, I'd first suggest you go read this MDN article but the basic idea is that the shadow DOM allows you to create custom elements by encapsulating styles and logic with that element that are hidden from the scripts and CSS of the page it lives on.
Let's see what happens when we turn it on. My component decorator now looks like this.
@Component({
  ...
  template: `
  <div>
    <h2>shadowDOM</h2>
    <ul class="list-group">
      @for(item of listItems; track item){
        <li class="list-group-item">{{item}}</li>
      }
    </ul>
  </div>
  `,
  styles: [
    `
      div{
        padding:1rem;
        border:1px dashed grey;
        margin:1rem;
      }
      ul{
        padding:unset;
      }
    `
  ],
  encapsulation:ViewEncapsulation.ShadowDom
})
and if I inspect the DOM I can see a shadow tree.

An implication is that global styles won't apply to this component. This is still a bit of a unique use-case, but I think it's probably more common than using None. If you had an external stylesheet being loaded from a CDN, and a component that you didn't want to be styled by it, you could use ShadowDom to avoid having to overwrite any styles.
That's it!
Now you know about ViewEncapsulation and when/why you might change the default behavior. There are further details you can read on the new angular docs, which I find to be much more helpful than the old ones. Check them out!